Thursday, July 23, 2015

english paper pieced plus quilt

A while ago I hinted at a little project I was working on, using Mollie (Wild Olive)'s tutorial for English paper piecing plus blocks. This is genius! Those of us who love to have a hand work project going at all times salute you Mollie!

What started off as a collection of Aqua/gray/low volume pluses evolved into this sweet mini that will forever hang on my studio wall.

Here are my 21 original plus blocks all sewn together....

When I got to this point I was perplexed. What to do next? Appliqué the funky shape to a solid? hmm no that didn't seem quite right. Then I decided to make some partial plus blocks to fill in the edges....
ah yes! Much better. This did require creating a little triangle piece to fill in the four corners. Take a peak at the back! I was so proud of myself when I saw how nicely everything laid into place. This is what happens when you take the time to be consistent in your gluing and piecing...


I pressed all of the edges out flat (see above) and then I trimmed it up into a 17 inch square...
I also ironed a square of shape flex 101 on the back to give it some stability. Added some 2 1/2 inch borders (yummy grunge in ocean)....
And set it aside for a day or two while I mulled over my quilting options. Eventually I decided on a simple crosshatch, which was easy to do with perfectly squared up pluses!

It finished up at 21 inches square. Thanks for a great tutorial Mollie!


Wednesday, July 22, 2015

Pouch with a View

My good friend Mahriam over at Three Owls Handmade  has done it again! Her newly released Pouch with a View pattern is available on Payhip and also on Etsy and it's a winner people! You're going to want to get your hands on this one.

She told me this all started when she realized she was carrying her hexie projects around in a ziploc bag! For real? This is the girl who designs gorgeous bags and pouches in her sleep. A ziploc bag? So she created three sizes of the see through pouch to match the sizes of gallon, quart and sandwich sized ziploc.

I was so happy when she asked me to test the pattern out for her (ok, let's be honest here, I begged! I think she let me test it just to shut me up!) When I saw her prototypes on Instagram I thought, "it looks like an aquarium!" (seriously? where do I come up with these weird thoughts?) So I ran right off to Joann's to hunt down some fishy fabric and the vinyl I needed. Before the night was over, I had made this large version of the pouch....


I couldn't wait to make more! I had some Lighthearted fabric (by the lovely Ayumi at Pink Penguin) that I had been hoarding saving for the perfect project. This medium pouch came together quickly...


And then I had to try a small pouch (which, yes, is rectangular, oops! but yours will be square because you will use the correct sized pieces!)

And I thought I was done with pouches for a bit (or at least until my big zipper order arrives, teehee). But then I remembered the tiny half inch hexies I had begun assembling a year ago and then lost interest in. Hmmmm.... I wonder.....


Well yes! they do indeed look adorable inside a Pouch with a View! So all in all, I completed four pouches in no time flat. What a great pattern this is. Go get one. NOW! Happy pouch making.


Tuesday, July 21, 2015

schoolhouse tunic - with pockets!

Recently I got it in my head that the Schoolhouse Tunic should have pockets! I mean, really, everything should have pockets, don't you think? While teaching a Washi Dress class at Stitched with Love I thought, hmmm, I wonder if those Washi pockets would work on a Schoolhouse Tunic? Bought me some Parson Gray fabric and brought it home to try it out.
I cut out my tunic as directed on the pattern and cut the separate pocket pieces using my Washi pattern. Then I stitched the pocket pieces to the sides of the skirt front and back pieces, six inches down from the top, with a scant 5/8 inch seam.

And just to personalize it a bit, I used a bias strip of gingham to face the back neck edge. Because, bias gingham? Come on! Nobody will know it's there but me, but it just feels right.

Finished in a day and I love it! Pockets worked perfectly. Now, Mr Weatherman, about all those 100 degree days in the forecast...... Is it fall yet?


Sunday, July 19, 2015

bee blocks for Lisa

I'm so happy that I am on the ball this month... my bee blocks to be given to Lisa at our August guild meeting are already done! Lisa gave us each the bright pink and the green solid fabrics below & asked us to make 2 of the 30 blocks from Piece N Quilt's 30 days of Sewing Quilt Blocks. We could make any blocks we want to and use fabric from our stash for the rest of the block. Here's my pink block.... yes, I did indeed choose the block with the most half square triangles and a gazillion points to match. And yes, I did tackle this block in the evening when I was way overtired. DUMB!
 It's an awesome block pattern, but I did a less than stellar job, so I decided not to count it as one of the two blocks I give Lisa. I'll give it to her and let her decide whether she wants to put it in her quilt, or possibly use it to line a hamster cage, hahahaha. I wouldn't blame her a bit.

Anyways, my green block went together much better. Why yes, indeed, I chose a much simpler block this time (I'm not THAT stupid!)
 And a pink block remake, this block I really love! Would love to do a whole quilt of these some day....
Otherwise, there's been lots of secret sewing going on here, some of which I'll be able to share with you soon. Hope you're having some sewing days this summer too!

Thursday, July 9, 2015

english paper pieced kiss block (a tutorial)

I'm a huge fan of Mollie over at Wild Olive. Have you checked out her blog? You must! A month or so ago she posted this tutorial for English Paper Piecing a plus quilt. Genius! She included a free pdf for the paper pieces needed. I bookmarked it for later on, knowing I wanted to give this a try. On Tuesday, which was crafty Tuesday over here, I gave it a whirl.....
Let me just say, I have gone crazy with the pluses and there are many many more finished. But that's a whole other blog post for another day. Today I want to share something else.

While I was working on these pluses, I found myself thinking "hmmmm I wonder if I could turn these into the raspberry kisses blocks that I love so much?" Here's Rachel (Wooden Spoon Quilts) original tutorial for the kiss blocks made by machine. I love this tutorial and have made several things using it! But could I EPP the same blocks? I wondered. (and I know a few of you are rolling your eyes at me right now! I SEE YOU THROUGH MY COMPUTER! humor me people!)

the pillow I made for Catherine for our MQG swap using Rachel's tutorial
A mini I made for my sewing space also using Rachel's tutorial.


After a restless night designing EPP Kiss blocks in my mind, I set to work. Seriously, I was still in my pajamas (no there are no photos, it wasn't pretty. And by it, I mean me) working out the math and creating my blocks.

I started with pluses made using Mollie's tutorial. I think her little templates look like houses, don't you? So from here on out, I shall refer to them as such. To make one EPP Kiss block, you need to prepare:

4 houses for the plus (for mine I used all the same fabric for these, this is the color in the center)
4 houses with the roofs cut off (or you could cut four 1 1/2" squares) in a second color (mine are light gray)
2 squares, each one 3 1/2", cut in half on the diagonal like this:
so four triangles, prepared in a third color, mine are dark gray. 

You can use your favorite method to baste the fabric to your cardstock. I happen to prefer glue basting. But if you like to stitch baste yours, feel free! When you get your pieces prepared, you can lay them together to see how it will look, like this:


I learned a few things along the way that made stitching this together so much easier and I thought I'd share them here. To avoid piecing those squares into tight corners, Stitch two rows like this, with a square on either side of a house:

Now add your extra houses to one side....
And then stitch it all together like this...

Well now, that's a cute little block, isn't it? But we're not done! Remember those triangles? Attach the long edge of a triangle to each side of your block...

when you lay the triangle face down to sew, the point lines up nicely with the point in the center of your block! Isn't that clever? a happy coincidence..... I love to use binder clips to hold my bigger pieces in place while I stitch.

Once all four triangles are added, your block is complete!
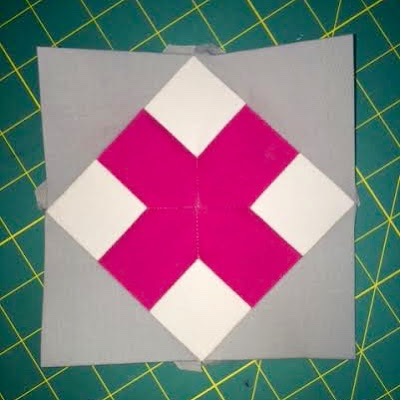
EPP Kisses block finishes at 6 1/2"
And, if you're like me, you'll need to make a second one right away just because....


Kind of fun, huh? I think so too. I can't wait to make a few more and turn them into something useful. 

Oh hey, are you on Instagram? so much crazy inspiration there! You can find me here. If you post your EPP Kisses blocks on Instagram, use the hashtag #eppkisses so we can all see them and oooh and ahhhh, ok? Have a happy day! 


Wednesday, July 8, 2015

Modern challenge

Last night at McKinney Modern Quilt Guild we shared our finished Riley Blake Challenge quilts. Although quite a few received the fabric initially, many were uninspired and only three of us actually completed a project! I'll admit that the fat eighth bundle of Cottage Garden that I received didn't motivate me much at first. Although the colors are favorites of mine, the flowers and birds in the line really didn't say "modern" to this girl. I added a solid white and mottled gray, both Riley Blake basics per the rules (oh Ellyn, you rule follower you!) Then I had an idea, started chopping away and, in the end, I am quite pleased with what I ended up with!
 You may remember that Imagine is my word of the year for 2015. I've never made a quilt for my word of the year before ("try something new" was one of the challenge requirements, CHECK!). Now I want to go back and make some quilts to represent my past words. Stay tuned!

Something else I did new was to piece my own fabric for the applique. I used 60 degree triangles and had fun rearranging the pieces to create "light" for my bulb...
 I machine appliqued it all, which I used to be terrible at but I feel like I'm getting better! Also my straight line quilting was, well, straight! Which is also new for me, haha!
 A label for the back and this baby is DONE!
 Did you make something for this challenge? I'd love to see!